こんにちは、臼田です。
みなさん、リモート開発してますか?(挨拶
今回はAzure Image Builderを利用してMicrosoft Dev Boxでイメージカスタマイズを作成する際の具体的なパターンとして、Chocolateyを利用して任意のソフトウェアをセットアップするためのテンプレート作成方法を紹介し、これを使った更新の手順をまとめます。
初期からAzure Image Builderを利用したMicrosoft Dev Boxのセットアップについては前回の下記記事を参照してください。
今回は、一度上記のように構築された後の更新について扱います。
Chocolateyを利用するテンプレート作成
実は前回の記事でも参照していた大本の下記手順でもテンプレートとしてChocolateyが利用されていました。

これを利用すれば任意のソフトウェアがインストールできます。今回はPython3をインストールしていきます。以下のようになります。
{
    "$schema": "http://schema.management.azure.com/schemas/2015-01-01/deploymentTemplate.json#",
    "contentVersion": "1.0.0.0",
    "parameters": {
        "imageTemplateName": {
            "type": "string"
        },
        "api-version": {
            "type": "string"
        },
        "svclocation": {
            "type": "string"
        }
    },
    "variables": {},
    "resources": [
        {
            "name": "[parameters('imageTemplateName')]",
            "type": "Microsoft.VirtualMachineImages/imageTemplates",
            "apiVersion": "[parameters('api-version')]",
            "location": "[parameters('svclocation')]",
            "dependsOn": [],
            "tags": {
                "imagebuilderTemplate": "win11multi",
                "userIdentity": "enabled"
            },
            "identity": {
                "type": "UserAssigned",
                "userAssignedIdentities": {
                    "<imgBuilderId>": {}
                }
            },
            "properties": {
                "buildTimeoutInMinutes": 100,
                "vmProfile": {
                    "vmSize": "Standard_DS2_v2",
                    "osDiskSizeGB": 127
                },
                "source": {
                    "type": "PlatformImage",
                    "publisher": "microsoftvisualstudio",
                    "offer": "visualstudioplustools",
                    "sku": "vs-2022-ent-general-win11-m365-gen2",
                    "version": "latest"
                },
                "customize": [
                    {
                        "type": "PowerShell",
                        "name": "Install Choco",
                        "inline": [
                            "Set-ExecutionPolicy Bypass -Scope Process -Force; [System.Net.ServicePointManager]::SecurityProtocol = [System.Net.ServicePointManager]::SecurityProtocol -bor 3072; iex ((New-Object System.Net.WebClient).DownloadString('https://community.chocolatey.org/install.ps1'))"
                        ]
                    },
                    {
                        "type": "PowerShell",
                        "name": "Install Python3",
                        "inline": [
                            "choco install -y python3"
                        ]
                    }
                ],
                "distribute": [
                    {
                        "type": "SharedImage",
                        "galleryImageId": "/subscriptions/<subscriptionID>/resourceGroups/<rgName>/providers/Microsoft.Compute/galleries/<sharedImageGalName>/images/<imageDefName>",
                        "runOutputName": "<runOutputName>",
                        "artifactTags": {
                            "source": "azureVmImageBuilder",
                            "baseosimg": "win11multi"
                        },
                        "replicationRegions": [
                            "<region1>",
                            "<region2>"
                        ]
                    }
                ]
            }
        }
    ]
}
構成要素を説明します。
今回は利用するイメージをVisual Studio 2022 (Microsoft Dev Box compatible)にしています。このイメージはMicrosoft Dev Boxの互換のあるVisuarl Studioのイメージです。これはresources[0].properties.source パス内(41行目あたり)で定義されています。
イメージに対するカスタマイズはresources[0].properties.customize パス内で定義され、48行目はPowerShellを利用したChocolateyインストールコマンドです。これは参照元のテンプレートのままでもありますが、公式サイトにも同じインストールコマンドがあるため、これで問題なさそうです。
{
    "type": "PowerShell",
    "name": "Install Choco",
    "inline": [
        "Set-ExecutionPolicy Bypass -Scope Process -Force; [System.Net.ServicePointManager]::SecurityProtocol = [System.Net.ServicePointManager]::SecurityProtocol -bor 3072; iex ((New-Object System.Net.WebClient).DownloadString('https://community.chocolatey.org/install.ps1'))"
    ]
},
実際のChocolateyを利用したインストールは念の為コマンドを分け55行目から定義してあります。コマンド自体はChocolateyの使い方に沿ってお使いください。
{
    "type": "PowerShell",
    "name": "Install Python3",
    "inline": [
        "choco install -y python3"
    ]
}
ちなみに、Windowsでのパッケージ管理はChocolateyの他にもwingetを利用する方法もありますが、これは私が試している限りではあまりうまくいかず、Azure Image Builderでは難易度が高そうでした。以下はDev Boxのイメージセットアップにwingetを利用した方の記事ですが、手こずった内容や使用したスクリプトについてまとまっています。
特に問題になる点は「Image BuilderのPowerShellタスクがPowerShell(Core)ではなくWindows PowerShellで実行される」という点です。wingetはPowerShell(Core)でのみ動作するため頑張る必要があります。
提供されているスクリプトも確認しましたが、かなり個別のケースのためのもので、私のPSスキルでは理解できなかったので大人しくChocolateyを利用しました。
イメージの更新
テンプレートの外観としてはこれでいいのですが、使う際には上記の中身を埋めていかないといけません。以降はこのテンプレートを利用して更新作業を行っていきます。
まず、改めて開き直したPowerShellのセッションで、変数を再定義するところから始めます。ちなみに私はCloudShell上で実行しています。
$currentAzContext = Get-AzContext
$subscriptionID=$currentAzContext.Subscription.Id
$imageResourceGroup="<リソースグループ名>"
$runOutputName="<作成されるイメージの名前>"
$imageDefName ="<イメージ定義名>"
$galleryName= "<Azure Compute Gallery名>"
$location="<リージョン1>"
$replRegion2="<リージョン2>"
$identityNameResourceId="<アイデンティティ名>"
## テンプレートは必要に応じ更新する
$templateFilePath = "image_template_install_python.json"
イメージテンプレートに参照元にある置き換えコマンドを実行して仕上げます。
(Get-Content -path $templateFilePath -Raw ) -replace '<subscriptionID>',$subscriptionID | Set-Content -Path $templateFilePath
(Get-Content -path $templateFilePath -Raw ) -replace '<rgName>',$imageResourceGroup | Set-Content -Path $templateFilePath
(Get-Content -path $templateFilePath -Raw ) -replace '<runOutputName>',$runOutputName | Set-Content -Path $templateFilePath
(Get-Content -path $templateFilePath -Raw ) -replace '<imageDefName>',$imageDefName | Set-Content -Path $templateFilePath
(Get-Content -path $templateFilePath -Raw ) -replace '<sharedImageGalName>',$galleryName| Set-Content -Path $templateFilePath
(Get-Content -path $templateFilePath -Raw ) -replace '<region1>',$location | Set-Content -Path $templateFilePath
(Get-Content -path $templateFilePath -Raw ) -replace '<region2>',$replRegion2 | Set-Content -Path $templateFilePath
(Get-Content -path $templateFilePath -Raw ) -replace '<imgBuilderId>',$identityNameResourceId | Set-Content -Path $templateFilePath
置き換えができたらイメージテンプレートをデプロイします。
## イメージ名は毎回更新する必要がある
$datetime=Get-Date -UFormat "%Y%m%d%H%M%S"
$imageTemplateName="vscodeWinTemplate-compatible" + $datetime
## イメージテンプレートのデプロイ
New-AzResourceGroupDeployment -ResourceGroupName $imageResourceGroup -TemplateFile $templateFilePath -Api-Version "2020-02-14" -imageTemplateName $imageTemplateName -svclocation $location
デプロイできたらビルドを開始します。
## イメージビルド
Invoke-AzResourceAction -ResourceName $imageTemplateName -ResourceGroupName $imageResourceGroup -ResourceType Microsoft.VirtualMachineImages/imageTemplates -ApiVersion "2020-02-14" -Action Run -Forceビルドは内容などによりますが1時間以上かかります。完了したかは以下のコマンドで確認します。LastRunStatusRunStateがSucceededになれば完了です。
PS /home/user> Get-AzImageBuilderTemplate -ImageTemplateName $imageTemplateName -ResourceGroupName $imageResourceGroup | Select-Object -Property Name, LastRunStatusRunState, LastRunStatusMessage, ProvisioningState

Name                                       LastRunStatusRunState LastRunStatusMessage ProvisioningState
----                                       --------------------- -------------------- -----------------
vscodeWinTemplate-compatible20240517211442 Succeeded                                  Succeeded
イメージ定義の詳細画面で新しいバージョンが発行されていることが確認できます。
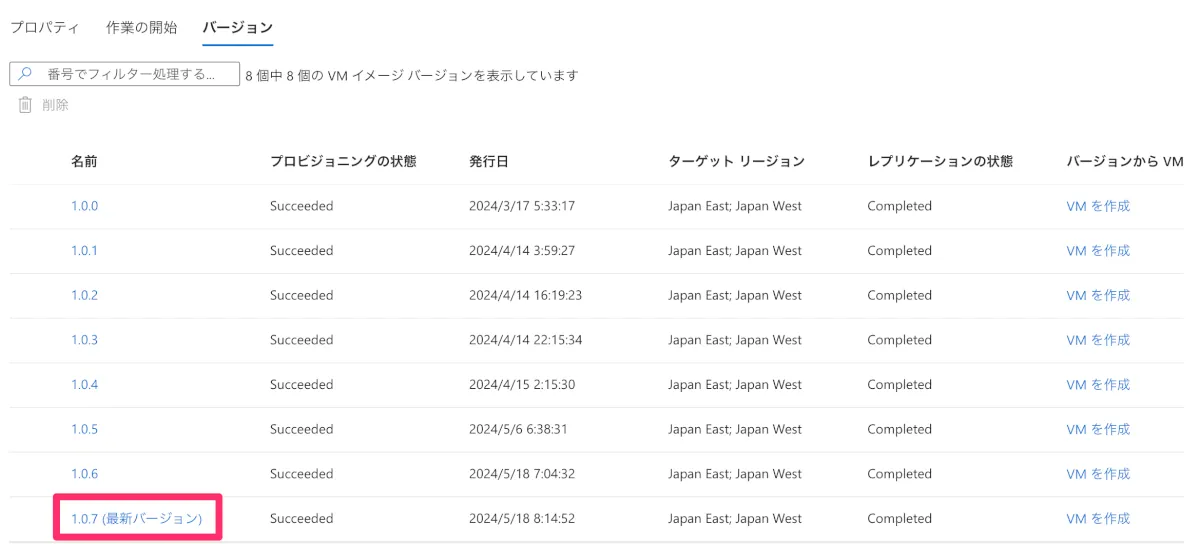
ちなみに、仕上がっているイメージテンプレートを微修正して更新する場合には、PowerShellで再定義する変数は以下だけで済みます。
$imageResourceGroup="<リソースグループ名>"
$location="<リージョン1>"
## イメージ名は毎回更新する必要がある
$datetime=Get-Date -UFormat "%Y%m%d%H%M%S"
$imageTemplateName="vscodeWinTemplate-compatible" + $datetime
## テンプレートは必要に応じ更新する
$templateFilePath = "image_template_install_python.json"
続いてDev Box定義を更新する必要があります。イメージバージョンを最新のものに変更します。イメージバージョンにlatestが指定されている場合は自動で更新されるのですが、Dev Box定義の更新自体時間がかかるため、しばらく待つ必要があります。更新が完了したら画面上でイメージバージョンが更新されます。

以上で準備完了です。
Dev Boxの作成
それでは更新したイメージを使ってDev Boxを作成します。開発者のポータルからDev Boxを作成します。このときに、「すべてのプールを表示」を選択するとイメージバージョンが更新されているか確認できます。
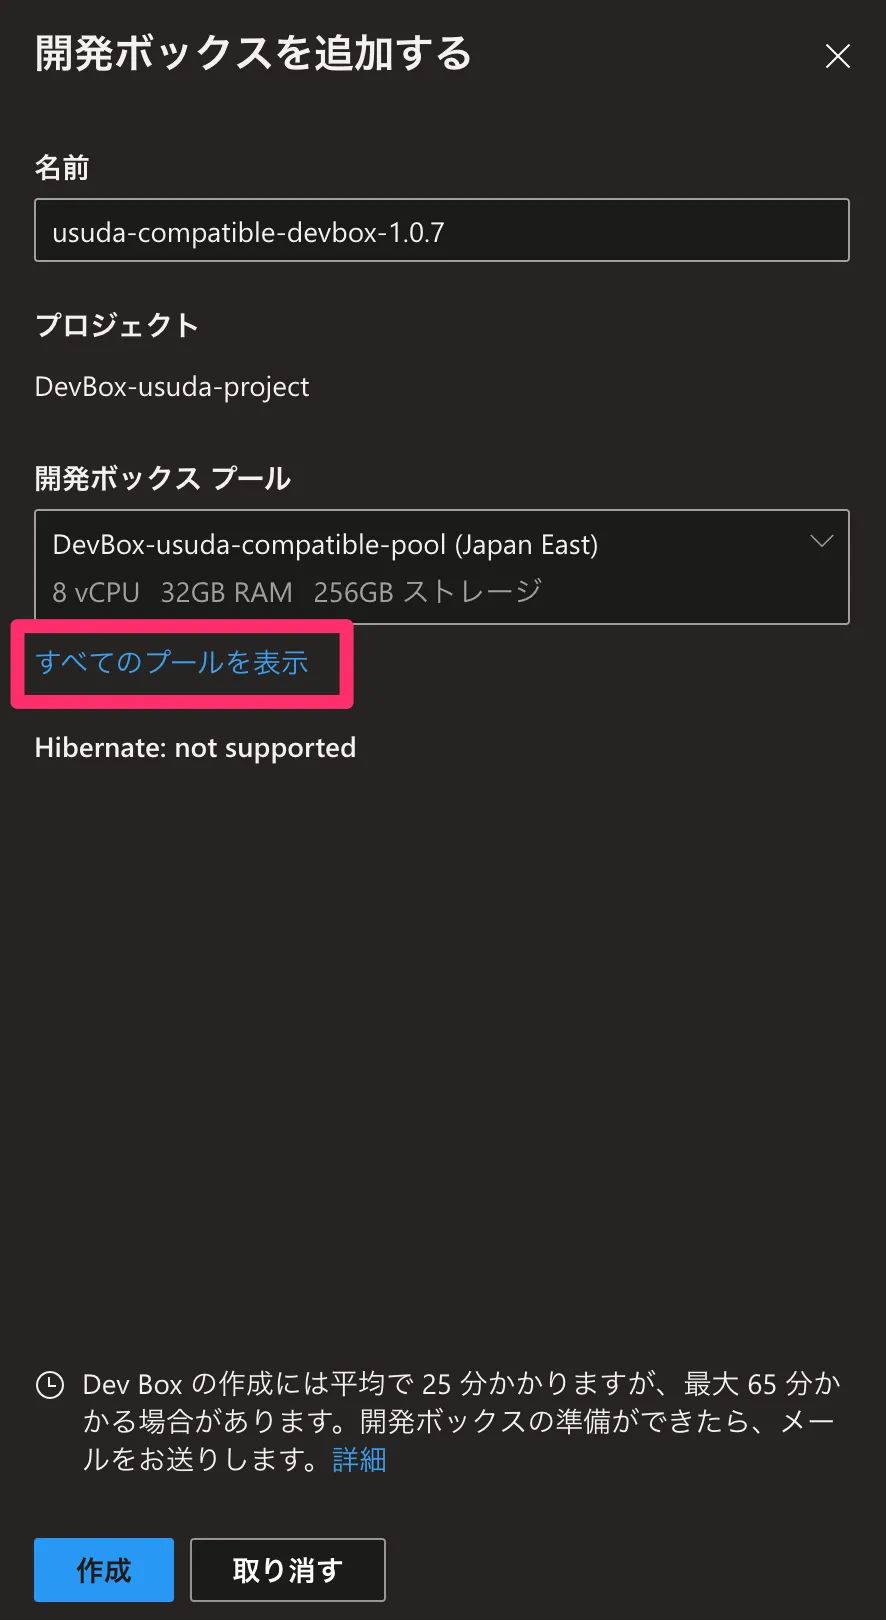
一覧から更新されたバージョンが確認できました。

作成を開始したらまた1時間程度待ちます。作成完了後、環境を見てみましょう。
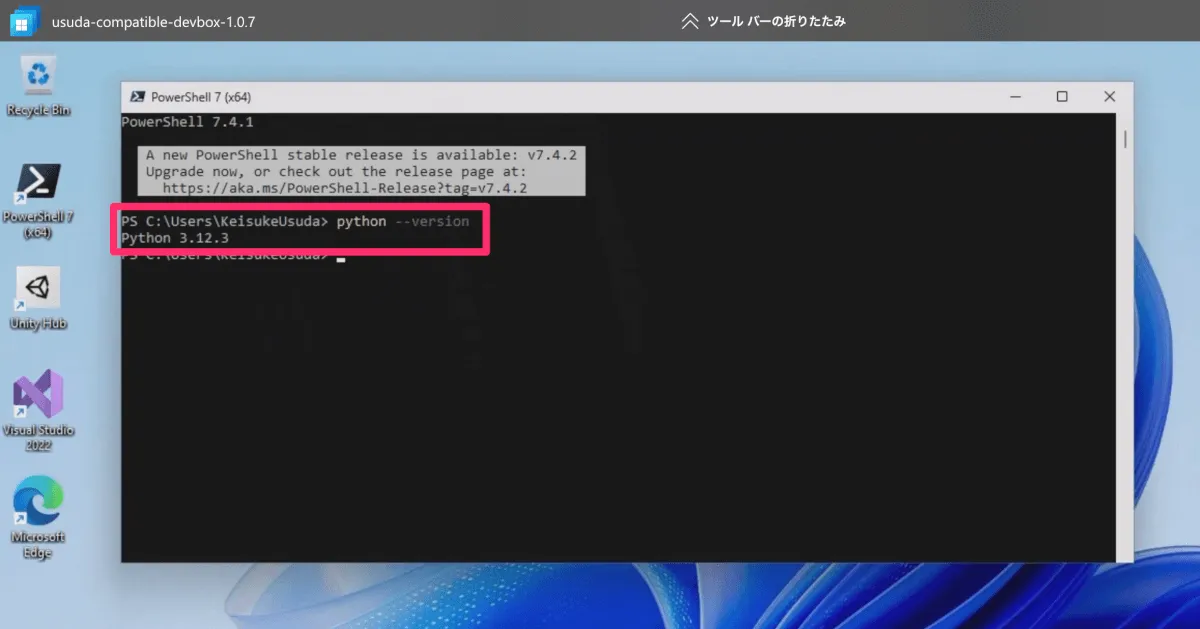
想定通りPython3がインストールできていました。
まとめ
Azure Image Builderを利用してMicrosoft Dev Boxでイメージをカスタマイズするときに任意のソフトウェアをインストールするテンプレートとその更新方法を紹介しました。
一部UIが無いため手順がかなり手間なので、是非参考にしてください。
ちなみに、こういったDev Boxの不便な点を解消すべくMicrosoftにフィードバックをしています。CLIのみの箇所の画面実装や、デプロイの自動化のための実装例掲載を改善したいと感じた方はぜひ下記に投票をお願いします!